Saturday, August 21, 2010

Hue-style Beef Noodles

Most people are familiar with the Vietnamese beef noodle soup, pho (pronounced fuh). Pho is good, but bun bo Hue (pronounced boom baw way), or Hue-style beef noodle soup, is great. If pho was like flying a kite, bun bo Hue would be like flying a jet fighter: intense and not for the weak. If the red color of the broth doesn’t give it away, the first bite will. In central Vietnam, Hue is an area known for its generous use of chili peppers in cooking.

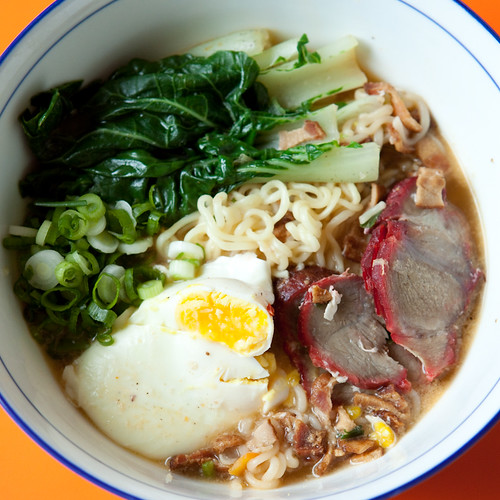
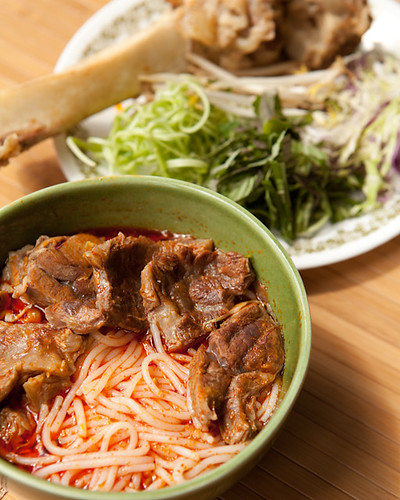
A good bowl of bun bo Hue will make you look like you just did yogalates in a sauna. But not all bun bo Hue is extremely spicy. Sometimes, it's served not spicy at all. And even though it's called beef noodle soup, pork knuckles and shanks are an important part of the dish. Just please don’t know me how I know about yogalates. The recipe below is courtesy of Mai Pham of Bon Appetit.

beefsoup-1

Ingredients:

6 lemongrass stalks (bottom 3 inches only), outer layers peeled
3 pounds beef shank
8 cups low-salt chicken broth
8 cups water

1 1/2 tablespoons vegetable oil
1 1/2 onions, thinly sliced, divided
1 garlic clove, minced
1 tablespoon (or more) sambal oelek or Thai chiles
1 1/2 teaspoons paprika
3 tablespoons fish sauce (nuoc nam or nam pla)*
2 tablespoons sugar
2 1/2 teaspoons red shrimp paste with soya bean oil*
1/2 teaspoon salt

1 8.8-ounce package dried thin rice noodles (vermicelli-style)
2 green onions, chopped
1/4 cup chopped fresh cilantro
2 cups thinly shredded cabbage
1/2 cup rau ram (Vietnamese coriander)* or Thai basil leaves* or regular basil leaves
3 dried Thai bird chiles,* chopped (optional)
4 lime wedges

Directions:

Finely chop enough lemongrass stalks to measure 4 teaspoons. Cut remaining stalks in half. Place beef and stalks in large pot. Add broth and 8 cups water; bring to boil. Reduce heat; simmer 1 1/2 hours.

Heat oil in medium skillet over medium heat. Add 1/3 of sliced onions and garlic; sauté 1 minute. Add 1 tablespoon sambal oelek, paprika, and chopped lemongrass; sauté 1 minute. Add sambal oelek mixture to soup; mix in fish sauce, sugar, shrimp paste, and salt. Simmer until beef is tender, skimming foam from surface, about 1 hour. Remove beef from soup. Skim fat from surface of soup. Simmer soup until reduced to 8 cups, about 10 minutes. Add more sambal oelek for spicier flavor. Trim off any fat from beef; cut meat into bite-size pieces.

Bring large saucepan of water toboil. Add noodles; boil 1 minute. Drain; rinse under cold water and drain again. Using scissors, cut noodles crosswise. Divide noodles among 4 large bowls. Top with beef, remaining sliced onions, green onions, and cilantro.

Bring soup to boil; ladle over noodles. Toss cabbage and rau ram in small bowl. Sprinkle over soup. Top with chiles, if desired; squeeze lime over.

Saturday, August 14, 2010

Tagliatelle with Truffle Butter

Despite my doctor’s warnings, I love rich, buttery pasta dishes. But I can’t help but feel guilty after consuming a large bowl of carbs and cream. Then, somewhere along the way, I was introduced to truffles added to buttery pasta, which is good since truffles are like expensive mushrooms. And since mushrooms are said to have medicinal benefits that must mean truffles are extremely beneficial to my health. Healthy pasta? Check.

trufflepasta-1

Ingredients

Kosher salt
1/2 cup heavy cream
3 ounces white truffle butter
Freshly ground black pepper
1 (8.82-ounce) package Cipriani tagliarelle dried pasta or other egg fettuccine
3 tablespoons chopped fresh chives
3 ounces Parmesan, shaved thin with a vegetable peeler

Directions

Add 1 tablespoon salt to a large pot of water and bring to a boil.

Meanwhile, in a large (12-inch) saute pan, heat the cream over medium heat until it comes to a simmer. Add the truffle butter, 1 teaspoon salt, and 1/2 teaspoon pepper, lower the heat to very low, and swirl the butter until it melts. Keep warm over very low heat.

Add the pasta to the boiling water and cook for 3 minutes, exactly. (If you're not using Cipriani pasta, follow the directions on the package.) When the pasta is cooked, reserve 1/2 cup of the cooking water, then drain the pasta. Add the drained pasta to the saute pan and toss it with the truffle-cream mixture. As the pasta absorbs the sauce, add as much of the reserved cooking water, as necessary, to keep the pasta very creamy.

Serve the pasta in shallow bowls and garnish each serving with a generous sprinkling of chives and shaved Parmesan. Sprinkle with salt and pepper and serve at once.

FYI, I was lazy and used already grated Parmesan. Another thing to keep in mind is that the pasta absorbs a surprising amount of liquid, so the pasta might seem runny at first, leading you to think you won’t need the extra cooking water, but you’ll end up using it all. Just keep tossing as the liquid is absorbed and you’ll have creamy, tender truffle pasta.

Here, I served it with some "seared" scallops topped with some fleur de sel with dried garlic and basil. Yes, I know the scallops look fried. I got happy and used too much oil so the scallops ended up fried rather than seared. But it was still delicious.

Saturday, August 7, 2010

Vietnamese Pork Skewers

Last week I shared a simple recipe for naked fried chicken. Today I’ll share a deceptively simple Vietnamese recipe courtesy of my aunt and uncle from Austin. What makes it deceptively simple is the marinade. A casual eater would have no idea of the amount of time that goes into the ingredients: mincing hay-like lemongrass, toasting and grounding sesame seeds, thinly and uniformly slicing a slab of pork, and making a dark caramel sauce. For those with the dedication and free time, this recipe is worth all the effort.

porkskewers-1

Ingredients

2 tablespoons minced lemongrass
2 tablespoons white sesame seeds, lightly toasted, coarsely ground
1 tablespoon fish sauce
1 1/2 teaspoon of caramel sauce or 1 teaspoon light brown sugar
2 shallots, minced
1 clove garlic, minced
2 tablespoons vegetable oil
2/3 pound pork shoulder, untrimmed, cut across the grain into thin slices (about 2" wide by 4" long and 1/8" thick)
12 (8-inch) bamboo skewers, soaked in water 30 minutes

Directions

Combine the lemongrass, sesame seeds, fish sauce, caramel sauce, shallots, garlic and oil in a bowl and stir well to blend. Add the pork and let it marinate for at least 20 minutes. Thread the meat onto the skewers and set aside.

Preheat a grill with hardwood charcoal. Oil the grill, then grill the pork slices until the meat is done and the edges are nicely charred, about 3 to 4 minutes. To make life easier, we used one of those fish grill baskets which let us flip 6 skewers at a time rather than burning our finger tips turn each skewer individually.

Saturday, July 31, 2010

Simple Fried Chicken

Like everyone reading this blog, I don’t have enough time in the day. Between my day job, my nearly 4-month old daughter and America’s Got Talent, I hardly have time for the gym…um…yeah. But just because we all are trying to accomplish more than there are hours in a day, that doesn’t mean we can’t enjoy some yummy home-cooked goodness. Often times, food is like photography in that less is more. When setting up a shot, I focus on 3 photographic elements: foreground, subject, and background. For me, a similar trinity applies to cooking my own concoctions: cooking method, subject, and spices. Overly simple? Maybe. But the recipe below is proof that simple can still be delicious.

chicken-1
Ingredients

1 1/2 to 2 pounds of chicken drumsticks (subject)
1 teaspoon of garlic salt
1/2 teaspoon of ground pepper
1 teaspoon of dried rosemary (use fresh if you have it)
1/2 cup of cooking oil

In a large bowl, combine the chicken, salt, pepper, and rosemary. Toss to coat evenly and refrigerate for at least an hour before cooking. Sometime long ago I learned that the average palate really only registers 3 flavors at a time. Since that has stuck through the years, when creating my own dishes, I try to start off with only 3 spices when cooking. If I must add a fourth, it’s usually cayenne to add some heat.

In a 12-inch cast-iron skillet, heat the oil over medium-low heat. Let the oil get nice and hot before adding the chicken. Cook the chicken for 18-20 minutes, turning three times. When I fry chicken legs, I treat them as having 4 sides. This way, the legs are golden brown all around rather than burnt on two opposing sides and white on the other two.

Serve with your favorite starch and veggies, which are rice and spinach for me.

Saturday, July 24, 2010

Clams and Ham at Dolce Vita

My sister-in-law visited recently and requested that we get some pizza at Dolce Vita. My response was a quote of Jules in Pulp Fiction, “Shit Negro! That's all you had to say!” Unfortunately, the reference was lost on her and we enjoyed a moment of awkward silence followed by my attempt to explain the reference followed by more awkward silence.

In addition to great pizza, Dolce Vita is a favorite spot of mine for photographing food. It’s something about the antique glass plus the black tables plus the colorful pizzas that make for some great food photo opportunities.

ham pizza-1
The first pizza was a special of porchetta and Portobello and basil, which is fancy talk for ham, fungus and weeds. Nomenclature aside, the pizza was great. The porchetta would make Oscar Meyer green with envy and the mushrooms were nicely sautéed.

clam pizza-1
The next pizza was their vongole, which is Italian for clams. Adorning this pie were vongole, garlic, cherry tomatoes and mozzarella. I’m a fan of clams and what I really liked about this pizza was that the clam juices worked its way through the melted cheese and into the crispy crust. The result was a juicy pizza with a bottom whose crispiness was paper-thin. Any juices that collected on my plate were sopped up by the crust that I butterflied to maximize its juice sopping capacity.

So if you find yourself in Dolce Vita
Try the pizza named after clams
Their crust is like a crispy pita
And you can say you ate like Tam

Saturday, July 17, 2010

The Chewy

For nearly a decade, I have been in search for the perfect chocolate chip cookie recipe. This hasn’t been a Field of Dreams type of effort but more of a karaoke kind of effort: I try it because it sounds fun, get disappointed at the lackluster results, and then try it again when I’ve forget about the disappointment. But this might have changed since I’ve tried Alton Brown’s “The Chewy” recipe. The recipe might not be perfect but it’s closer than any other recipe I’ve tried.

To confess my weakness, I have made this recipe twice in the past week because I lack will power. But my failed weight loss is your gain in that I may have stumbled upon a possible improvement to Alton’s near-perfect recipe. Though his recipe calls for bread flour, on my second batch I inadvertently used cake flour. Since I’m no food expert, I have no idea if there are any actual differences between the two flours. However, by using cake flour instead of bread flour, the cookies seem to be chewier and less cakey, which puts the chocolate more on the center stage.

cookie-1
Ingredients

* 2 sticks unsalted butter
* 2 1/4 cups bread flour (or cake flour)
* 1 teaspoon kosher salt
* 1 teaspoon fresh baking soda
* 1/4 cup sugar
* 1 1/4 cups brown sugar
* 1 egg
* 1 egg yolk
* 2 tablespoons milk
* 1 1/2 teaspoons vanilla extract
* 2 cups semisweet chocolate chips (I used Guittard extra dark)

Melt the butter in a heavy-bottom medium saucepan over low heat. Sift together the flour, salt, and baking soda and set aside.

Pour the melted butter in the mixer's work bowl. Add the sugar and brown sugar. Cream the butter and sugars on medium speed. Add the egg, yolk, 2 tablespoons milk and vanilla extract and mix until well combined. Slowly incorporate the flour mixture until thoroughly combined. Stir in the chocolate chips.

Chill the dough for an hour. Heat oven to 375 degrees F.

Using a tablespoon-sized measuring spoon, scoop onto parchment-lined baking sheets, 6 cookies per sheet. Bake for 14 minutes or until golden brown, checking the cookies after 5 minutes. Rotate the baking sheet for even browning. Cool completely and store in an airtight container or do like me and eat 6 right away.

Saturday, July 10, 2010

Crispy Salmon Skin

Most people know of salmon fillets at the grocery store. These fillets are what most people are comfortable eating: huge boneless slabs of fish. However, my favorite parts of salmon are those parts typically discarded.

While doing some seafood shopping at Houston's 99 Ranch Market, I picked up a saran wrapped packaged labeled “salmon belly.” As the name implies, these are the chunks of salmon taken from the fatty underside of the fish. Salmon bellies come skin-on, full of bones, and glistening with fish fat. To my surprise, under the salmon bellies in this package were pieces of glorious salmon skin. These slivers of skin, which are typically discarded during the filleting process, have a thin layer of flesh and are used for those crispy salmon skin handrolls at sushi bars.


To cook the salmon skin slivers, simply panfry them skin side down in some oil for 6 minutes. Flip and cook for a minute just so the flesh side is browned. Sprinkle with some sea salt and freshly squeezed lemon. Serve with rice and vegetables and you’ll have a deliciously nutritious meal. With so many vitamin companies making so much money from selling capsules of fish oil, eating salmon skin is my way of sticking it to the vita-Man.

Saturday, July 3, 2010

Roasted Eggplant, Tomato and Mozzarella

I’m continuing my Italian kick with a dish that combines two of my favorite fruits, eggplants and tomatoes, with one of my favorite cheeses, mozzarella. This recipe is courtesy of Michael Chiarello of the Food Network.


Ingredients

3 large globe eggplants, each about 1 pound, cut crosswise into 1/2-inch slices
1/4 cup kosher salt, plus more for seasoning
Extra-virgin olive oil
2 tablespoons good-quality balsamic vinegar
Freshly ground black pepper
16 slices large tomato, each 1/4-inch thick
1 1/2 teaspoons minced garlic
1 1/2 pounds fresh mozzarella, cut into 1/4-inch slices

Directions

In a large bowl toss the eggplant slices with 1/4 cup kosher salt. Using your fingertips, evenly distribute the salt on both sides of each slice. Place the eggplant in a colander set over a large bowl or sheet pan to catch juices. Set aside for 1 to 2 hours.

Preheat oven to 450 degrees F. Line two 18 by 13-inch baking sheets with heavy-duty foil.

Rinse the eggplant under cold water and dry thoroughly with paper towels.

Arrange the eggplant slices in a single layer on one baking sheet. Brush olive oil on 1 side. Brush with balsamic vinegar and sprinkle with freshly ground pepper.

Drizzle the other pan with 2 tablespoons olive oil. Arrange the tomato slices in a single layer, season with salt and pepper, then sprinkle with the minced garlic.

Roast the tomato slices until they are very soft and just beginning to brown, 10 to 15 minutes, without turning. Bake the eggplant slices until they are tender and well browned, 20 to 30 minutes, without turning. Let the tomato and eggplant slices cool until you can handle them with your fingers.

Make a short stack starting with eggplant on the bottom, 1 slice mozzarella, and then tomato. Top with another piece of eggplant. Warm the stacks in the oven until mozzarella lightly melts. Drizzle with olive oil and serve.

Saturday, June 26, 2010

Garten's Garlic Bread

Here’s another recipe by Ina Garten, the Barefoot Contessa. If you’ve noticed by now, I’m currently in possession of her book, Back to Basics.


Ingredients

6 large garlic cloves, chopped
1/4 cup chopped flat-leaf parsley
1/4 cup chopped fresh oregano leaves
1/2 teaspoon kosher salt
1/4 teaspoon freshly ground black pepper
1/2 cup olive oil
1 loaf ciabatta bread
2 tablespoons unsalted butter

Directions

1. Preheat the oven to 350 degrees F.

2. Place the garlic in the bowl of a food processor and process until minced. Add the parsley, oregano, salt and pepper and pulse twice.

3. Heat the olive oil in a medium saute pan and add the garlic mixture. Remove the pan from the heat.

4. Slice the ciabatta bread in half horizontally, and spread the butter on 1 half. Spread the garlic mixture on the other half of the bread, and put the halves together. Wrap the bread in aluminum foil.

5. Place the bread in the oven and bake for 5 minutes. Open the foil, and continue baking for an additional 5 minutes.

It’s a good recipe but I have a few suggestions if you’re planning to make it. Increase the garlic to 9 cloves. Reduce the olive oil by half. Spread butter and the garlic mixture on both halves of the bread loaf. The bread wasn’t garlicky enough for me. The original recipe called for way too much oil. By buttering just one side and “garlicking” the other, you end up with a half loaf of buttered bread and a half loaf of oil bread.

Happy eating!

Saturday, June 19, 2010

Desir Bakery

I did some weekend grocery shopping at 99 Ranch Market at I-10 and Blalock. On the way out, I noticed the Desir Bakery next to the checkout lines was not overflowing with people as it usually is, so I decided to stop in to pick up a small pastry to satisfy my sweet tooth. It was my first time in the bakery so I really didn’t know what to expect. I really enjoy going outside of my epicurean comfort zone and just following the crowds of people who know what they're doing...at least they seem like they do. For all I know, it was everyone's first visit.

The bakery itself was tiny. Everyone had to leave our shopping carts full of purchased groceries parked just on the other side of the rope dividers. Filling the wooden shelves were freshly baked goods, both savory and sweet. The comforting aroma wrapped me in a warm blanket of happy and induced an unnatural appetite considering I just had a big lunch an hour earlier. So instead of getting just a small sweet pastry, I picked all of the following.


These savory loaves were their green-onion rolls and golden garlic bread. Yes, the golden garlic bread was actually that disturbingly yellow. The bread itself was light and airy. Both items were a bit lacking in green onion and garlic flavors but that’s my personal preference. I like enough onions and garlic to cause my breath to be as offensive as my former neighbors.


The first of the sweets was coconut bread. Sweet coconut and raisin paste filled the inner cavities of this loaf the size of my face. The bread looked to be haphazardly folded over the filling but there must be some method to the madness since coconut was evenly distributed throughout this huge pastry.


Next was their “sponge cupcake.” This was simply awesome. Sure, the A-word is used too often these days but one bite into this soft, fluffy sweetness and you’ll use the A-word too. The cupcake is like angel food cake but more heavenly. The next time I pick this up, I’ll try it in strawberry shortcake or something similar.


Then I had their red bean mochi. Common in Asian cooking is the use of beans in desserts. This might seem odd to some but I assure you it’s delicious. This “cookie” was a sweet red bean filling wrapped in soft, flaky dough, covered with toasted sesame seeds.


Finally, I happily forced down the pineapple cake. This mini cake, the size of four dice, had a nutty crust enveloping its pineapple gel of a filling. My only problem with this item was that I only bought one.

So the next time you’re picking up some fresh fish from 99 Ranch Market’s superb seafood department, don’t forget to stop into the bakery on your way out.

Saturday, June 12, 2010

Barefoot Buttermilk Cheddar Biscuits

Don’t you sometimes want to kick off your Sunday shoes, get in touch with your feminine side and prance around the kitchen like Ina Garten, the Barefoot Contessa? Yeah…me neither. But I do enjoy trying out her recipes. This one came from her book Back to Basics, page 228. This was my first time making biscuits and so I'm sure I didn't do it quite right, but it still turned out awesome. I just hope my local Red Lobster does not ban me for posting this recipe. (That's right. I’ll still eat at Red Lobster.)

biscuits-6961

2 cups of all-purpose flour, plus some for kneading
1 tablespoon baking powder
1-1/2 teaspoon kosher salt
12 tablespoons (1-1/2 sticks) cold unsalted butter, diced
1/2 cup cold buttermilk, shaken
1 cold extra-large egg
1 cup grated extra-sharp cheddar
1 egg beaten with 1 tablespoon milk or water

1. Preheat the oven to 425°F

2. Place 2 cups flour, baking powder, and salt in the bowl of an electric mixer fitted with the paddle attachment. With the mixer on low, add the butter and mix until the butter is the size of peas.

3. Combine the buttermilk and egg in a small glass measuring cup and beat lightly with a fork. With the mixer still on low, quickly add the buttermilk to the flour mixture and mix until moistened. In a small bowl, blend the cheese with a small handful of flour and, with the mixer still on low, add cheese to the dough. Mix only until roughly combined.

4. Dump the dough out onto a well-floured board and knead lightly about six times. Roll the dough into a rectangle approximately 5 x 10 inches. With a sharp, floured knife, cut the dough lengthwise in half and then across in quarters, making 8 rough rectangles. Transfer to a baking sheet lined with parchment paper. Brush the tops with the egg wash, sprinkle with sea salt, and bake for 20 to 25 minutes, until the tops are brown and the biscuits are cooked through. Serve hot or warm

Saturday, June 5, 2010

Polenta Taragna

Today I’m expressing my Italian side with an Italian polenta. This urge was partly due to the fact I love cornmeal and partly because I enjoy speaking with a fake Italian accent while cooking Italian dishes. I believe the louder one speaks with his or her best Italian accent while cooking Italian food, the better the food will be. The first time I did this 10 years ago, my wife thought it was hilarious. Today, she was much less amused.

polenta-5013

1-1/4 cups of polenta
2-1/2 ounces of Taleggio cheese
2 tablespoons of butter (unsalted sweet cream)
4 cups of water
1 teaspoon of salt

1. Place water and salt in a large copper pot and bring to a boil. Meanwhile, cut the butter and cheese into small cubes.

2. When the water begins to boil, sprinkle the polenta into the water and stir with a wooden spoon. Continue to stir for about 40 minutes until the polenta becomes nice and thick.

3. While still stirring, slowly add the butter and cheese to melt all that creamy goodness together. As soon as everything is melted together, remove from heat and serve.

In the photo here I had it with some broiled bone-in, skin-on chicken thighs and steamed broccoli.

Saturday, May 29, 2010

Honey Vanilla Pound Cake

The one problem I ever had with pound cake is its name. I used to think it was because the cake weighed a pound. Then I learned that the name came from how it is traditionally made from a pound each of eggs, butter, flour and sugar. So “four-pound cake” would be a more suitable name because of the total weight of the ingredients and because that’s how much weight I gain eating it. Nevertheless, as a food blogger, I have pushed past the pain and pounds to give you the following. I hope this recipe and my increased risk of a stroke brings a smile to your day.

poundcake-7271

1/2 pound(2 sticks) unsalted butter, at cool room temperature
1 1/4 cups sugar
4 extra large eggs, at room temperature
2 tablespoons honey
2 teaspoons pure vanilla extract
1 teaspoon grated lemon zest
2 cups sifted cake flour
1 teaspoon kosher salt
1/2 teaspoon baking powder

1. Preheat oven to 350 degrees.

2. Grease the bottom of an 8½ x 4½ x 2½ inch loaf pan.

3. Line the bottom with parchment paper, then grease and flour the pan.

4. Using an electric mixer fitted with the paddle attachment, cream the butter and sugar on medium speed for 3-4 minutes, until light.

5. Meanwhile, put the eggs, honey, vanilla and lemon zest in a glass measuring cup but do not combine.

6. With the mixer on medium low speed, add the egg mixture, one egg at a time, scraping down the bowl and allowing each egg to become incorporated before adding the next egg.

7. Sift together the flour, salt and baking powder.

8. With the mixer on low speed, add it slowly to the batter until just combined.

9. Finish mixing the batter with a rubber spatula and pour it into the prepared pan. Smooth the top.

10. Bake for 50-60 minutes until a toothpick inserted in the center comes out clean.

11. Cool for 15 minutes, turn out onto a baking rack, and cool completely.

Source: Back to Basics by Ina Garten

Saturday, May 22, 2010

Pan-fried Pomphet with Lemongrass

IMG-4510

I’m told that my first solid food was fried fish. Whether or not that’s true, fried fish has been a long time favorite of mine. Sure, frying fish will make the whole house smell like, well, fried fish. And though I understand that some may gag at the thought of fried fish infusing the furrows of their fine furniture, for me, that beloved aroma takes me to a time when life was fun and fancy-free. This recipe for a pan-fried whole fish is deliciously simple and is a go-to dish for when I have little time to cook for 4-6 other fish lovers. Here I used whole pomfret but feel free to use your favorite fish. Any small fish that is firm and oily would be great, e.g., mackerel, herring, etc.

1 whole fish about 3 pounds, cleaned
1 teaspoon salt
1 stalk of lemongrass
1 whole Thai chili pepper
1/2 cup vegetable oil

1. Mince the lemongrass and chili pepper until nearly fine. Add the salt. Continue mincing until fine. A food processor saves time but I try to use a mezzaluna when possible. If using a food processor, make sure to chop the lemongrass into quarter-inch slices or smaller (like chopping green onions) before processing otherwise you’ll get unpleasantly long strands of lemongrass fibers.

2. Pat the fish dry. Cut 3 slits into each side of the fish. Thoroughly coat the fish with the lemongrass mixture making sure to work the seasoning into the newly made slits.

3. In your favorite fish-frying skillet, fry over medium heat about 10 minutes each side or until you can lift the meat at the slits and the bone underneath looks cooked through. Serve with rice and your favorite greens, which is ong choy for me.

Saturday, May 15, 2010

Stir-fried Ong Choy

Growing up, one of the few ways my mom got me to eat my veggies was by stir-frying them. Looking back, I’m glad it was this and not a broccoli milkshake.

As you can see, ong choy is a green leafy vegetable native to East and Southeast Asia. However, because it has grown like a weed since its introduction to the United States, the U.S. Department of Agriculture has designated it as a “noxious weed.” Just to be clear, the USDA uses “noxious” in reference to the plant’s effect on the environment, not my stomach. Ong choy, like the potato, was historically a food source for the poor but is now a common offering on menus.

ongchoy-4514

This is an extremely quick and easy recipe for those nights your short on time.

1 bunch of ong choy (approximately 6 cups uncooked)
6 cloves of garlic, coarsely chopped
1/4 cup of vegetable oil

1. Thoroughly wash the ong choy of any dirt. Discard about 1 inch from the thick ends of the stalks. Cut into 2-inch sections. FYI, I was taught a much more involved process of breaking these long stalks down into shorter strips for frying but just cutting them is much more efficient and doesn’t degrade the taste of the dish.

2. In a large wok, heat the oil over medium high heat. When the oil is hot, add the garlic and cook for 15 seconds or until fragrant. Immediately add the ong choy (before the garlic burns) and toss until all the leaves are evenly wilted, about 2 minutes. Serve with your favorite Vietnamese savory dish (such as braised pork and eggs or catfish in caramel sauce)

Saturday, May 8, 2010

Shrimp & Scallion Pancakes

pancake-4363

For some reason, it seems that many things can be improved when made in pancake form. Maybe it has something to do with sizzling batter in a large pan of grease. Whatever the reason, you’re about to learn how to make some delicious discs full of shrimp and scallions. Whether you call them pancakes, omelets, or frittatas, I assure you this recipe will taste the same regardless of its name.

3 eggs
½ pound of medium shrimp, peeled (devein optional)
1 stalk of scallion, chopped
1 teaspoon of salt

1. In a large bowl, beat the eggs, salt and scallions. Add shrimp and mix until even.

2. In a large, heavy-bottom skillet, heat a liberal amount of vegetable oil (enough to cover the bottom of the pan). Test the heat of the oil by adding a few drops of the egg. The oil should sizzle immediately upon contact.

3. Using a ¼-cup measuring cup, ladle in the batter similar if making pancakes. You should be able to make about 3 at a time. Make sure about 3 shrimps are in each ladle. Once added to the oil, flatten out the shrimp into a single layer immediately, before the egg mixture sets. Cook for 2-3 minutes on each side. Serve with rice and soy sauce for dipping.

Saturday, May 1, 2010

Vietnamese Banana Cake

bananacake-4156
If Vietnam were to have a national fruit, it would probably be the banana. With so many different varieties available, there’s a banana for practically every culinary need. Today we’ll make a cake with bananas.

The Vietnamese banana cake is similar to fruitcake in density and texture but is unlike fruitcake in that people would love to receive this banana cake as a gift…at least I would.

1-½ lbs extremely ripe bananas
1 large egg
¼ cup unsalted butter, melted and cooled
¼ cup coconut milk, the creamy white stuff, not the juice
1/3 cup sugar
¾ cup all-purpose flour
1 tablespoon of sugar in the raw

1. Preheat oven to 375. Oil an 8-inch round cake pan.

2. Choose the least ripe banana and set aside for decorating the top of the cake. Peel and slice the remaining bananas into ¼-inch slices and place into a large bowl.

3. In a separate bowl, lightly beat the egg and then add the sugar, coconut milk and butter. Mix until blended. Pour over bananas and fold with a rubber spatula until even.

4. Sift the flour directly onto the banana mixture and continue to fold with a rubber spatula until even. Pour the batter into the cake pan and shake or tap until the batter evens out.

5. Cut the remaining banana into 1/8-inch slices and decorate the top of the cake with all your creativity and none of you inhibitions. Sprinkle on the raw sugar.

6. Bake for 1 hour or until a toothpick comes out clean and the top is a nice golden brown. I personally bake it for an extra 15 minutes so that the edges get extra crusty with the hardened caramel.

Wednesday, April 28, 2010

Vietnamese Pork & Eggs

porkegg-4028
This is the second of two sweet-n-savory recipes this week. Thit kho (pronounced like “tit caw”…yeah, it sounds dirty in English) is a dish where the pork is slow-cooked in a caramel sauce with hard-boiled eggs. This one can be considered the Vietnamese version of bacon & eggs except it’s not usually consumed for breakfast.

1-½ lbs boneless pork leg with skin & fat, cut into 1-inch by 2-inch chunks
¼ cup of sugar
¾ cup of water
3 tablespoons of fish sauce
6 medium eggs, hard-boiled and peeled
12 oz of your favorite canned coconut juice, strained of coconut pieces

1. In a large bowl, evenly coat the chunks of pork with fish sauce and coconut juice. Marinate for an hour.

2. In a 4-quart pan, caramelize the sugar with the water over medium heat for 15 minutes or until the sauce is a deep brown.

3. Carefully, add the coconut juice that has been marinating the pork but not the pork itself. Return to a simmer. The caramel will seize temporarily but then dissolve once the juices simmer again.

4. Add the pork and eggs. Return to a simmer, then partially cover and cook for another 1-¼ hour, turning the pork every 15 minutes. Uncover and cook for another 15 minutes or until the sauce has reduce by half of its original amount.

5. Serve with your favorite boiled green veggies.

Sunday, April 25, 2010

Catfish in Caramel Sauce

catfish-4030
This past week was a sweet-n-savory week for me. In honor of my hankering, you’ll learn two Vietnamese recipes that incorporate caramel and fish sauce. To the uninitiated, these two ingredients are like Romeo and Juliet; the relationship may seem to defy the stars but it’s as natural as that light through yonder window.

The first of these two recipes is for catfish simmered in a caramel sauce.

1-½ lbs catfish steaks, 1-inch thick
2 teaspoons brown sugar
½ teaspoons black pepper
¼ teaspoons salt
¼ cup sugar
½ cup water
2 tablespoons fish sauce
2 tablespoons of vegetable oil
2 cloves of garlic, minced

1. Put the catfish into a large glass bowl and coat evenly with brown sugar, pepper, salt and fish sauce. Set aside.

2. In a shallow pan large enough for all the catfish to fit snugly in a single layer, caramelize the sugar with the oil and half of the water over medium heat for 15 minutes or until the caramel is a deep dark color but before it smokes.

3. Add the rest of the water and bring back to a simmer. The caramel will seize and there will be a lot of sizzling but when it simmers again, the sugar will dissolve.

4. Add the garlic and catfish. Be sure to pour in all of the fish sauce mixture collected at the bottom of the bowl. Return to simmer. Cover and cook for 30 minutes or until the liquid reduces to about half. Flip the catfish half way through cooking.

5. Serve with rice and your favorite boiled green vegetable. The sauce is edible liquid gold. Pour it over rice and try to have sauce, rice and fish in every bite you take.
lemongrass-1
Can hay-like stalks of grass make for a good ice cream flavor? Only if you follow the directions detailed below.

The recipes for Vietnamese ice cream, or kem (pronounced like “cam” in “camera”), vary as widely as spots on a Dalmation. In this recipe, instead of eggs and cream, we’ll use cornstarch. The result will be a thick, creamy consistency that is denser than a Blue Bell country day.

lemongrass-2
4 cups of whole milk
4 to 5 stalks of lemongrass, coarsely chopped
¾ cup of sugar
3 tablespoons of cornstarch

1. In a 1-quart saucepan, simmer 3 cups of the milk with the lemongrass over medium low heat, stirring occasionally. When the milk begins to bubble, remove from heat, cover and seep for at least 30 minutes to infuse the milk with flavors from the lemongrass.

2. In a large mixing bowl, combine the rest of the milk, sugar and cornstarch. Whisk until sugar and cornstarch are dissolved.

3. Add the warm lemongrass mixture by slowly pouring through a sieve. Using a spatula, press down on the filtered pieces of lemongrass to extract as much of the milk out. Discard the lemongrass.

4. Whisk the milk mixture until even. Wash the saucepan to clean of all milk buildup accumulated during the initial simmering. Pour the milk mixture back into the clean saucepan. Simmer over medium low heat, stirring constantly. Once the milk thickens to the consistency of a custard (dip a spoon in and the back of the spoon should come out with a thick even coat of milk), remove from the heat.

5. Immediately pour into a glass bowl. Cover with plastic and refrigerate for at least 24 hours.

6. Once the mixture has thoroughly chilled, prepare it with an ice-cream maker following the manufacturer’s instructions.

7. Serve with fresh mint leaves or chopped peanuts or both.

Monday, April 12, 2010

Ramen with Bacon, Egg & Char-Siu Pork

Ramen-1

Just because ramen is the go-to food item for those on a tight budget, it doesn’t mean that we can’t indulge our inner chefs when feasting on some freeze-dried noodles. As I've mentioned before, for someone who grew up on this stuff, a package of ramen noodles is like a canister of Play-Doh where you're limited only by your imagination. The following is one of the myriad of ways to make instant noodles a wok to remember.

Before we start, it’s imperative that you forget the “old” way of making ramen and follow my steps below. Don’t worry; when food is concerned, I don’t lead people astray.

Ramen-2
2 slices of bacon, chopped widthwise into thin 1/8-inch strips
1 clove of garlic, minced
6 cups hot water
1 large egg
1 good helping of char-siu pork from your favorite Chinese BBQ provider (actual amount depends the level of your char-siu pork hankering)
1 package of your favorite instant ramen (currently, mine is Nong Shim’s Shin Ramyun Gourmet Spicy)
2 cups of baby bok choy, leaves separated and washed
1 stalk of green onion, finely chopped (optional)

1. In a 4-quart pot or larger over high heat, cook the strips of bacon for about 3 minutes or until crispy brown, stirring occasionally. Add the garlic and continue stirring for about a minute to release all the garlic’s flavors.

2. Just as the garlic begins to brown, add the hot water to the bacon and garlic and bring to a boil. I know it seems like a lot of water but, by the time we finish this recipe, most of it will evaporate.

3. Once boiling, crack the egg into the water and poach until desired doneness (3 minutes for soft, 6 minutes for hard). Turn heat to medium otherwise it'll boil over. With a slotted spoon, transfer the cooked egg to a bowl.

4. Now add the noodles and its seasoning packet(s). We don’t want to add the seasoning before cooking the egg otherwise the egg will absorb all the salty powdery goodness leaving nothing for the broth. The Shin Ramyun comes with two packets: one is the actual seasoning and the other contains dried herbs and veggies. When the water boils again, cook for another 3 minutes or until desired tenderness. I specify 3 minutes because I prefer my ramen chewy rather than mushy, though I understand some prefer otherwise. Using a slotted spoon or your finest chopstick skills, transfer only the noodles and pork into the bowl with the waiting egg.

5. Bring the water back to a rapid boil. Add the leaves of baby bok choy. Stir and let it come back to a boil. Cook for another minute or until white stalks are slightly translucent and tender. Overcooking will result in mushy bok choy and 7 years of bad luck.

6. Ladle in the bok choy and broth, garnish with chopped green onions and serve.

I typically split this recipe into two bowls to share with my wife so the photo shows only half of the recipe.

Friday, April 9, 2010

Steamed Chicken with Ginger Scallion Dipping Sauce

Chicken-1
This is one of my favorite recipes. It’s easy, delicious, and can feed two adults for 4-6 business days. Also, part of the reason this is a favorite recipe is because I get to use a mezzaluna (pictured below), one of my favorite tools in the kitchen. Growing up, my mama made me mince the old-fashioned way: constantly chopping with a heavy cleaver for 20-30 minutes. With one of these half-mooned miracles, I can get the same results in about 5 minutes. So using the mezzaluna is my way of letting my mama know she made me suffer for nothing. I still love her, though.

1 whole chicken (for less fat, see note below)
1 tsp ground pepper
2 tsp salt
3-inch section of ginger (about the size of both thumbs put together)
1 stalk of green onion
1 clove of garlic
1 tbsp canola oil

1. In a steamer the size of the International Space Station, bring a gallon of water to a boil.

Chicken-2
2. Clean the chicken and remove the neck and innards from the cavity. Set these tasty morsels aside for use in another recipe or discard. Rub the ground pepper and salt into the inner cavity of the chicken. Place the chicken in 12x12 glass baking dish. Cooking will result in large amount of chicken stock. To avoid a chicken that’s half submerged in stock, I place the rack from my toaster oven over the baking dish. This keeps the chicken suspended above the pool of deliciousness that will soon form.
3. Once the steamer is ready, carefully place the chicken into the steamer. Steam for 2 hours. Periodically check the water level and add water as needed.
4. Meanwhile, peel and chop the ginger and garlic. Similarly chop the scallions. Combine ginger, garlic, and scallions onto a cutting board. Using a mezzaluna, mince these ingredients until fine and evenly blended. Transfer to a small bowl. Add salt and canola oil and mix until even.

Chicken-3
5. When the chicken has steamed for 2 hours, remove from heat, remove lid, and let rest for 15 minutes before moving or cutting. This will set the extremely hot and tender meat; otherwise the bird will fall apart in your hands. Once cooled, remove the legs and wings. Chop the remainder into 1-inch pieces. Serve with rice (see below) and your favorite veggies.

With the clear, flavorful chicken stock you’ve now collected in the glass dish, you’re on your way to a myriad of other amazing recipes, including rice for the chicken. My favorite thing to eat with this steamed chicken is rice cooked in fresh chicken stock. Use this to cook 2 cups of jasmine rice and you’re well on your way to spiritual bliss.

Though I've called it "dipping sauce," I usually just mix a spoonful of the ginger-scallion goodness into the rice rice itself. This method also helps me save on soy sauce expenses.

FOR LESS FAT: Before placing the chicken in the steamer, pierce the chicken’s skin multiple times with a sharp knife or fork (12 to 20 times), especially the skin around the fatty areas, e.g., thighs. Be careful to not pierce the actual meat. These pierces will help the fat drip out into the baking dish. Before using the stock you’ve just collected, first pour it through a strainer into another container to remove impurities. Then, refrigerate for 3 hours or until the floating layer of fat solidifies. Carefully remove the layer of hardened lard and now you have yourself about a quart of 99% fat-free chicken stock.

Vietnamese Banana Tapioca Pudding

Banana-2974

One of the many quirks I have is that I prefer eating raw bananas while they're still greenish and unripe. By the time bananas turn yellow, they're too sweet for my preference. Luckily for me, I learned how to convert overly sweet bananas into a simple traditional Vietnamese dessert that exudes awesomeness.

"Chè chuối" (pronounced "chair chewy") is made with bananas and small tapioca balls. "Chè" refers to the traditional Vietnamese sweet dessert that is similar to soup or pudding. "Chuối" means banana. The fact you're still reading means you're awesome.

To make this delectable dessert, you will need the following:

3 cups water
1/3 cups small tapioca pearls
1 to 1-1/4 lbs of ripe bananas (about 4 regular bananas)
2/3 cups canned coconut milk
1/8 tsp salt
1/2 tsp vanilla extract
1 to 3 tsp sugar (see Step 5 below)
1/4 cups finely chopped peanuts (optional)

1. In a medium pot, bring the water to a boil. Add the tapioca and stir immediately so the balls don't stick to each other. Reduce heat to a slow boil and leave for 12 to 14 minutes until the tapioca is half cooked (mostly clear with a small white dot in the center). Stir occasionally to prevent the tapioca from sticking to the bottom of the pot. Be careful not to overcook; we want the tapioca chewy, not mushy.
2. Meanwhile, cut the bananas in half lengthwise and then again into 1-inch chunks. Set aside.
3. When the tapioca is ready as mentioned above (it will become thick and viscous), add the coconut milk and salt and stir until blended. Here's a little trick to make this dessert richer and creamier. Though the can tells us to shake well before using, I like to stick it to the man and not shake. Instead, I open the can and scoop out just the coconut cream that rises to the top. Of course whether you shake it like a Polaroid picture or not, the dessert will still taste great.
4. When the tapioca mixture reaches a boil again, add the banana pieces and stir until evenly distributed. Lower the heat and simmer for 2 minutes or until the bananas are tender, giving the flavors a chance to meld together. Remove from heat.
5. Because the sweetness of this dessert depends largely on the ripeness of the bananas you use, it’s best to add sugar to taste. So before dumping in more sugar, first taste the soup. If you want it sweeter, add 1 tsp of sugar, stir until blended, and taste again. Repeat until desired.
6. Serve with the chopped peanuts as a topping.

Serves 6-8 or 1 monster sweet tooth. Refrigerate unused portion and reheat before serving leftovers.

Sunday, March 7, 2010

Another Amazing Birthday

Over the weekend, the wife and I traveled to Austin to celebrate her aunt turning 60. I dare say I was more excited about the get together than her aunt. Why? Because of the food, of course. Her aunt is an amazing cook whose poor bookshelf is under undue strain from all the cookbooks she owns. Put the same amount of weight on the back of a pack mule and you'll be charged with animal cruelty. So in tried and true Vietnamese tradition, a birthday celebration means the birthday girl hosts an elaborate meal for everyone traveling from afar. Needless to say, I was giddy with excitement.

Austin-0206
For appetizers, my aunt-in-law (AIL) and my mother-in-law (MIL) rolled these picture-perfect spring rolls filled with lettuce, rice vermicelli, Chinese sausage, grated carrots, and fresh-picked happiness. What is it about mothers that everything food related ends up being near perfect? While rolling these, the two of them were gossiping like school girls and bickering like nemeses, both seemingly not paying attention to the food. However, this photo shows spring rolls that look more appetizing than those at most restaurants. I guess it's the secret superpowers of moms.

Austin-0212
For soups, we had a choice of two options. And, yes, I chose both options. The first was the wonton soup made with a pork/shrimp mixture. The broth, unlike commercial versions that are basically salt water, was a flavorful orgy of fresh chicken stock, sweet radishes, and pungent green onions. The wontons were cooked perfectly so that the dough was not a mushy mess.

Austin-0209
The second soup option was a tradition Vietnamese beef stew called bò kho (pronounced baw caw). Chunks of beef shank and tendons are slow cooked until melt-n-yo-mouth tender in a broth infused with lemongrass and star anise. The carrots are in the mix to successfully alleviate any guilt for the indulgence.

Austin-0211
And for the main course we had crab fried rice and fried shrimp patties. Now don't go thinking it's patties of ground shrimp, which can also be delicious. These patties are made with fresh whole shrimp and mung bean both melded together with batter. So when it comes down to it, it's battered fried shrimp. The inclusion of mung bean, like the carrots in bò kho, is really just there to break up the richness of the oily fried goodness. This foto only shows two patties but I easily consumed half a dozen. The red peppers helped kick the party into gear. Take a bite of the shrimp patty, take a bite of pepper, stuff my mouth with fried rice, wash it down with beer, repeat until physically incapacitated. So many meals of my life follow these simple steps.

Believe it or not, this was only lunch. My AIL prepared enough food with a dozen people in mind but there were plenty of leftovers. But as always, the leftovers end up being like socks in the laundry; it all eventually mysteriously disappears.

Saturday, January 16, 2010

Singapore Cafe

Today my wife and I dined at Singapore Cafe (12345 Bellaire Blvd near Cook in Houston). For those unfamiliar, this area is on the outskirts of Houston's Chinatown...the real Chinatown off of Bellaire, not the old Chinatown near downtown which is all but dead now.

I traveled to Singapore nearly 12 years ago with my brother and buddy. I fell in love with the place because it was extremely clean and the food was amazing! I was particularly overwhelmed by the 2-story food court nestled inside a parking garage. You read that right. Take a two-story parking garage, prevent cars from entering it, set up hundreds of food stands and you'll have yourself an unforgettable food court. Part of why this place was so impressive was the fact the food was amazingly cheap. At the time, a dish of rice, meat and veggies was approximately the equivalent of $2 US. So instead of saving money on food, I just ate 3 meals in one sitting. I would walk around and order whatever looked odd and/or appetizing, though not necessarily both. What else was I supposed to spend the money on?

Singapore-3691
So back to Singapore Cafe. I ordered their Singaporean/Hainanese chicken rice. Typically, to make this dish, a whole chicken is boiled and the rice is cooked with chicken stock but I understand the stock used to cook the rice isn't the same used to boil the chicken. The two are served with assorted pickled veggies with a side of several yummy sauces. In this case, the chicken was covered in one sauce with a side of hot sauce. The hot sauce is the kind of sauce I could eat with rice and nothing else. The spicy red stuff is vinegary and salty and limey and could potentially lead to world peace. The chicken was a free-range chicken, so it was slightly gamy and chewy. Though this might turn some away, I believe it's an essential part of the dish, not necessarily because the dish has roots in lower class society where the chicken is stretched to make an entire meal. No, the extra chewing is essential for me to prolong my enjoyment of the red happiness.

Singapore-3678
I washed it all down with an order of iced milk Milo. Milo is basically the lovechild of chocolate milk and Gatorade...at least that's what all the marketing wants you to believe. I really don't care whether or not it's good for me. I just know it's chocolaty goodness in a glass. It doesn't taste like "American" chocolate milk either. It has a distinct grainy flavor...I guess it's all the vitamins and nutrients at work.

Eating here made me feel like I was back in Southeast Asia perusing the aisles of countless food vendors. And with the impressively long menu they have, I'm definitely visiting this place again.