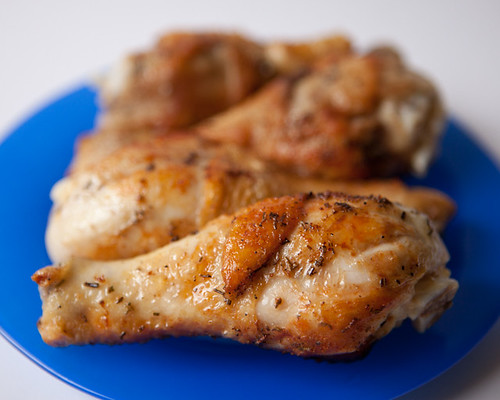
Saturday, July 31, 2010

Simple Fried Chicken

Like everyone reading this blog, I don’t have enough time in the day. Between my day job, my nearly 4-month old daughter and America’s Got Talent, I hardly have time for the gym…um…yeah. But just because we all are trying to accomplish more than there are hours in a day, that doesn’t mean we can’t enjoy some yummy home-cooked goodness. Often times, food is like photography in that less is more. When setting up a shot, I focus on 3 photographic elements: foreground, subject, and background. For me, a similar trinity applies to cooking my own concoctions: cooking method, subject, and spices. Overly simple? Maybe. But the recipe below is proof that simple can still be delicious.

chicken-1
Ingredients

1 1/2 to 2 pounds of chicken drumsticks (subject)
1 teaspoon of garlic salt
1/2 teaspoon of ground pepper
1 teaspoon of dried rosemary (use fresh if you have it)
1/2 cup of cooking oil

In a large bowl, combine the chicken, salt, pepper, and rosemary. Toss to coat evenly and refrigerate for at least an hour before cooking. Sometime long ago I learned that the average palate really only registers 3 flavors at a time. Since that has stuck through the years, when creating my own dishes, I try to start off with only 3 spices when cooking. If I must add a fourth, it’s usually cayenne to add some heat.

In a 12-inch cast-iron skillet, heat the oil over medium-low heat. Let the oil get nice and hot before adding the chicken. Cook the chicken for 18-20 minutes, turning three times. When I fry chicken legs, I treat them as having 4 sides. This way, the legs are golden brown all around rather than burnt on two opposing sides and white on the other two.

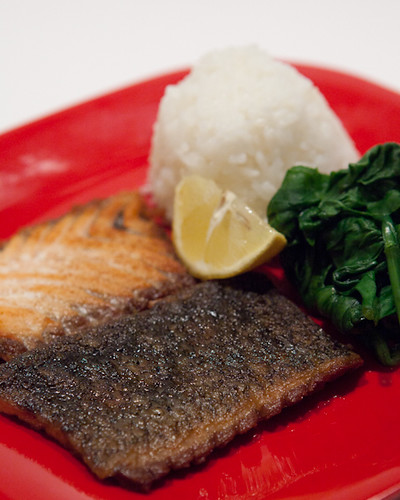
Serve with your favorite starch and veggies, which are rice and spinach for me.

Saturday, July 24, 2010

Clams and Ham at Dolce Vita

My sister-in-law visited recently and requested that we get some pizza at Dolce Vita. My response was a quote of Jules in Pulp Fiction, “Shit Negro! That's all you had to say!” Unfortunately, the reference was lost on her and we enjoyed a moment of awkward silence followed by my attempt to explain the reference followed by more awkward silence.

In addition to great pizza, Dolce Vita is a favorite spot of mine for photographing food. It’s something about the antique glass plus the black tables plus the colorful pizzas that make for some great food photo opportunities.

ham pizza-1
The first pizza was a special of porchetta and Portobello and basil, which is fancy talk for ham, fungus and weeds. Nomenclature aside, the pizza was great. The porchetta would make Oscar Meyer green with envy and the mushrooms were nicely sautéed.

clam pizza-1
The next pizza was their vongole, which is Italian for clams. Adorning this pie were vongole, garlic, cherry tomatoes and mozzarella. I’m a fan of clams and what I really liked about this pizza was that the clam juices worked its way through the melted cheese and into the crispy crust. The result was a juicy pizza with a bottom whose crispiness was paper-thin. Any juices that collected on my plate were sopped up by the crust that I butterflied to maximize its juice sopping capacity.

So if you find yourself in Dolce Vita
Try the pizza named after clams
Their crust is like a crispy pita
And you can say you ate like Tam

Saturday, July 17, 2010

The Chewy

For nearly a decade, I have been in search for the perfect chocolate chip cookie recipe. This hasn’t been a Field of Dreams type of effort but more of a karaoke kind of effort: I try it because it sounds fun, get disappointed at the lackluster results, and then try it again when I’ve forget about the disappointment. But this might have changed since I’ve tried Alton Brown’s “The Chewy” recipe. The recipe might not be perfect but it’s closer than any other recipe I’ve tried.

To confess my weakness, I have made this recipe twice in the past week because I lack will power. But my failed weight loss is your gain in that I may have stumbled upon a possible improvement to Alton’s near-perfect recipe. Though his recipe calls for bread flour, on my second batch I inadvertently used cake flour. Since I’m no food expert, I have no idea if there are any actual differences between the two flours. However, by using cake flour instead of bread flour, the cookies seem to be chewier and less cakey, which puts the chocolate more on the center stage.

cookie-1
Ingredients

* 2 sticks unsalted butter
* 2 1/4 cups bread flour (or cake flour)
* 1 teaspoon kosher salt
* 1 teaspoon fresh baking soda
* 1/4 cup sugar
* 1 1/4 cups brown sugar
* 1 egg
* 1 egg yolk
* 2 tablespoons milk
* 1 1/2 teaspoons vanilla extract
* 2 cups semisweet chocolate chips (I used Guittard extra dark)

Melt the butter in a heavy-bottom medium saucepan over low heat. Sift together the flour, salt, and baking soda and set aside.

Pour the melted butter in the mixer's work bowl. Add the sugar and brown sugar. Cream the butter and sugars on medium speed. Add the egg, yolk, 2 tablespoons milk and vanilla extract and mix until well combined. Slowly incorporate the flour mixture until thoroughly combined. Stir in the chocolate chips.

Chill the dough for an hour. Heat oven to 375 degrees F.

Using a tablespoon-sized measuring spoon, scoop onto parchment-lined baking sheets, 6 cookies per sheet. Bake for 14 minutes or until golden brown, checking the cookies after 5 minutes. Rotate the baking sheet for even browning. Cool completely and store in an airtight container or do like me and eat 6 right away.

Saturday, July 10, 2010

Crispy Salmon Skin

Most people know of salmon fillets at the grocery store. These fillets are what most people are comfortable eating: huge boneless slabs of fish. However, my favorite parts of salmon are those parts typically discarded.

While doing some seafood shopping at Houston's 99 Ranch Market, I picked up a saran wrapped packaged labeled “salmon belly.” As the name implies, these are the chunks of salmon taken from the fatty underside of the fish. Salmon bellies come skin-on, full of bones, and glistening with fish fat. To my surprise, under the salmon bellies in this package were pieces of glorious salmon skin. These slivers of skin, which are typically discarded during the filleting process, have a thin layer of flesh and are used for those crispy salmon skin handrolls at sushi bars.


To cook the salmon skin slivers, simply panfry them skin side down in some oil for 6 minutes. Flip and cook for a minute just so the flesh side is browned. Sprinkle with some sea salt and freshly squeezed lemon. Serve with rice and vegetables and you’ll have a deliciously nutritious meal. With so many vitamin companies making so much money from selling capsules of fish oil, eating salmon skin is my way of sticking it to the vita-Man.

Saturday, July 3, 2010

Roasted Eggplant, Tomato and Mozzarella

I’m continuing my Italian kick with a dish that combines two of my favorite fruits, eggplants and tomatoes, with one of my favorite cheeses, mozzarella. This recipe is courtesy of Michael Chiarello of the Food Network.


Ingredients

3 large globe eggplants, each about 1 pound, cut crosswise into 1/2-inch slices
1/4 cup kosher salt, plus more for seasoning
Extra-virgin olive oil
2 tablespoons good-quality balsamic vinegar
Freshly ground black pepper
16 slices large tomato, each 1/4-inch thick
1 1/2 teaspoons minced garlic
1 1/2 pounds fresh mozzarella, cut into 1/4-inch slices

Directions

In a large bowl toss the eggplant slices with 1/4 cup kosher salt. Using your fingertips, evenly distribute the salt on both sides of each slice. Place the eggplant in a colander set over a large bowl or sheet pan to catch juices. Set aside for 1 to 2 hours.

Preheat oven to 450 degrees F. Line two 18 by 13-inch baking sheets with heavy-duty foil.

Rinse the eggplant under cold water and dry thoroughly with paper towels.

Arrange the eggplant slices in a single layer on one baking sheet. Brush olive oil on 1 side. Brush with balsamic vinegar and sprinkle with freshly ground pepper.

Drizzle the other pan with 2 tablespoons olive oil. Arrange the tomato slices in a single layer, season with salt and pepper, then sprinkle with the minced garlic.

Roast the tomato slices until they are very soft and just beginning to brown, 10 to 15 minutes, without turning. Bake the eggplant slices until they are tender and well browned, 20 to 30 minutes, without turning. Let the tomato and eggplant slices cool until you can handle them with your fingers.

Make a short stack starting with eggplant on the bottom, 1 slice mozzarella, and then tomato. Top with another piece of eggplant. Warm the stacks in the oven until mozzarella lightly melts. Drizzle with olive oil and serve.