Saturday, June 26, 2010

Garten's Garlic Bread

Here’s another recipe by Ina Garten, the Barefoot Contessa. If you’ve noticed by now, I’m currently in possession of her book, Back to Basics.


Ingredients

6 large garlic cloves, chopped
1/4 cup chopped flat-leaf parsley
1/4 cup chopped fresh oregano leaves
1/2 teaspoon kosher salt
1/4 teaspoon freshly ground black pepper
1/2 cup olive oil
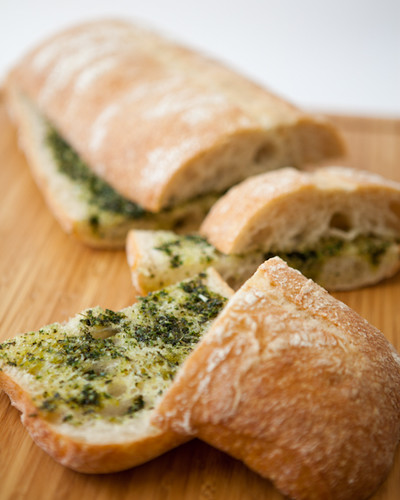
1 loaf ciabatta bread
2 tablespoons unsalted butter

Directions

1. Preheat the oven to 350 degrees F.

2. Place the garlic in the bowl of a food processor and process until minced. Add the parsley, oregano, salt and pepper and pulse twice.

3. Heat the olive oil in a medium saute pan and add the garlic mixture. Remove the pan from the heat.

4. Slice the ciabatta bread in half horizontally, and spread the butter on 1 half. Spread the garlic mixture on the other half of the bread, and put the halves together. Wrap the bread in aluminum foil.

5. Place the bread in the oven and bake for 5 minutes. Open the foil, and continue baking for an additional 5 minutes.

It’s a good recipe but I have a few suggestions if you’re planning to make it. Increase the garlic to 9 cloves. Reduce the olive oil by half. Spread butter and the garlic mixture on both halves of the bread loaf. The bread wasn’t garlicky enough for me. The original recipe called for way too much oil. By buttering just one side and “garlicking” the other, you end up with a half loaf of buttered bread and a half loaf of oil bread.

Happy eating!

Saturday, June 19, 2010

Desir Bakery

I did some weekend grocery shopping at 99 Ranch Market at I-10 and Blalock. On the way out, I noticed the Desir Bakery next to the checkout lines was not overflowing with people as it usually is, so I decided to stop in to pick up a small pastry to satisfy my sweet tooth. It was my first time in the bakery so I really didn’t know what to expect. I really enjoy going outside of my epicurean comfort zone and just following the crowds of people who know what they're doing...at least they seem like they do. For all I know, it was everyone's first visit.

The bakery itself was tiny. Everyone had to leave our shopping carts full of purchased groceries parked just on the other side of the rope dividers. Filling the wooden shelves were freshly baked goods, both savory and sweet. The comforting aroma wrapped me in a warm blanket of happy and induced an unnatural appetite considering I just had a big lunch an hour earlier. So instead of getting just a small sweet pastry, I picked all of the following.


These savory loaves were their green-onion rolls and golden garlic bread. Yes, the golden garlic bread was actually that disturbingly yellow. The bread itself was light and airy. Both items were a bit lacking in green onion and garlic flavors but that’s my personal preference. I like enough onions and garlic to cause my breath to be as offensive as my former neighbors.


The first of the sweets was coconut bread. Sweet coconut and raisin paste filled the inner cavities of this loaf the size of my face. The bread looked to be haphazardly folded over the filling but there must be some method to the madness since coconut was evenly distributed throughout this huge pastry.


Next was their “sponge cupcake.” This was simply awesome. Sure, the A-word is used too often these days but one bite into this soft, fluffy sweetness and you’ll use the A-word too. The cupcake is like angel food cake but more heavenly. The next time I pick this up, I’ll try it in strawberry shortcake or something similar.


Then I had their red bean mochi. Common in Asian cooking is the use of beans in desserts. This might seem odd to some but I assure you it’s delicious. This “cookie” was a sweet red bean filling wrapped in soft, flaky dough, covered with toasted sesame seeds.


Finally, I happily forced down the pineapple cake. This mini cake, the size of four dice, had a nutty crust enveloping its pineapple gel of a filling. My only problem with this item was that I only bought one.

So the next time you’re picking up some fresh fish from 99 Ranch Market’s superb seafood department, don’t forget to stop into the bakery on your way out.

Saturday, June 12, 2010

Barefoot Buttermilk Cheddar Biscuits

Don’t you sometimes want to kick off your Sunday shoes, get in touch with your feminine side and prance around the kitchen like Ina Garten, the Barefoot Contessa? Yeah…me neither. But I do enjoy trying out her recipes. This one came from her book Back to Basics, page 228. This was my first time making biscuits and so I'm sure I didn't do it quite right, but it still turned out awesome. I just hope my local Red Lobster does not ban me for posting this recipe. (That's right. I’ll still eat at Red Lobster.)

biscuits-6961

2 cups of all-purpose flour, plus some for kneading
1 tablespoon baking powder
1-1/2 teaspoon kosher salt
12 tablespoons (1-1/2 sticks) cold unsalted butter, diced
1/2 cup cold buttermilk, shaken
1 cold extra-large egg
1 cup grated extra-sharp cheddar
1 egg beaten with 1 tablespoon milk or water

1. Preheat the oven to 425°F

2. Place 2 cups flour, baking powder, and salt in the bowl of an electric mixer fitted with the paddle attachment. With the mixer on low, add the butter and mix until the butter is the size of peas.

3. Combine the buttermilk and egg in a small glass measuring cup and beat lightly with a fork. With the mixer still on low, quickly add the buttermilk to the flour mixture and mix until moistened. In a small bowl, blend the cheese with a small handful of flour and, with the mixer still on low, add cheese to the dough. Mix only until roughly combined.

4. Dump the dough out onto a well-floured board and knead lightly about six times. Roll the dough into a rectangle approximately 5 x 10 inches. With a sharp, floured knife, cut the dough lengthwise in half and then across in quarters, making 8 rough rectangles. Transfer to a baking sheet lined with parchment paper. Brush the tops with the egg wash, sprinkle with sea salt, and bake for 20 to 25 minutes, until the tops are brown and the biscuits are cooked through. Serve hot or warm

Saturday, June 5, 2010

Polenta Taragna

Today I’m expressing my Italian side with an Italian polenta. This urge was partly due to the fact I love cornmeal and partly because I enjoy speaking with a fake Italian accent while cooking Italian dishes. I believe the louder one speaks with his or her best Italian accent while cooking Italian food, the better the food will be. The first time I did this 10 years ago, my wife thought it was hilarious. Today, she was much less amused.

polenta-5013

1-1/4 cups of polenta
2-1/2 ounces of Taleggio cheese
2 tablespoons of butter (unsalted sweet cream)
4 cups of water
1 teaspoon of salt

1. Place water and salt in a large copper pot and bring to a boil. Meanwhile, cut the butter and cheese into small cubes.

2. When the water begins to boil, sprinkle the polenta into the water and stir with a wooden spoon. Continue to stir for about 40 minutes until the polenta becomes nice and thick.

3. While still stirring, slowly add the butter and cheese to melt all that creamy goodness together. As soon as everything is melted together, remove from heat and serve.

In the photo here I had it with some broiled bone-in, skin-on chicken thighs and steamed broccoli.