Wednesday, April 28, 2010

Vietnamese Pork & Eggs

porkegg-4028
This is the second of two sweet-n-savory recipes this week. Thit kho (pronounced like “tit caw”…yeah, it sounds dirty in English) is a dish where the pork is slow-cooked in a caramel sauce with hard-boiled eggs. This one can be considered the Vietnamese version of bacon & eggs except it’s not usually consumed for breakfast.

1-½ lbs boneless pork leg with skin & fat, cut into 1-inch by 2-inch chunks
¼ cup of sugar
¾ cup of water
3 tablespoons of fish sauce
6 medium eggs, hard-boiled and peeled
12 oz of your favorite canned coconut juice, strained of coconut pieces

1. In a large bowl, evenly coat the chunks of pork with fish sauce and coconut juice. Marinate for an hour.

2. In a 4-quart pan, caramelize the sugar with the water over medium heat for 15 minutes or until the sauce is a deep brown.

3. Carefully, add the coconut juice that has been marinating the pork but not the pork itself. Return to a simmer. The caramel will seize temporarily but then dissolve once the juices simmer again.

4. Add the pork and eggs. Return to a simmer, then partially cover and cook for another 1-¼ hour, turning the pork every 15 minutes. Uncover and cook for another 15 minutes or until the sauce has reduce by half of its original amount.

5. Serve with your favorite boiled green veggies.

Sunday, April 25, 2010

Catfish in Caramel Sauce

catfish-4030
This past week was a sweet-n-savory week for me. In honor of my hankering, you’ll learn two Vietnamese recipes that incorporate caramel and fish sauce. To the uninitiated, these two ingredients are like Romeo and Juliet; the relationship may seem to defy the stars but it’s as natural as that light through yonder window.

The first of these two recipes is for catfish simmered in a caramel sauce.

1-½ lbs catfish steaks, 1-inch thick
2 teaspoons brown sugar
½ teaspoons black pepper
¼ teaspoons salt
¼ cup sugar
½ cup water
2 tablespoons fish sauce
2 tablespoons of vegetable oil
2 cloves of garlic, minced

1. Put the catfish into a large glass bowl and coat evenly with brown sugar, pepper, salt and fish sauce. Set aside.

2. In a shallow pan large enough for all the catfish to fit snugly in a single layer, caramelize the sugar with the oil and half of the water over medium heat for 15 minutes or until the caramel is a deep dark color but before it smokes.

3. Add the rest of the water and bring back to a simmer. The caramel will seize and there will be a lot of sizzling but when it simmers again, the sugar will dissolve.

4. Add the garlic and catfish. Be sure to pour in all of the fish sauce mixture collected at the bottom of the bowl. Return to simmer. Cover and cook for 30 minutes or until the liquid reduces to about half. Flip the catfish half way through cooking.

5. Serve with rice and your favorite boiled green vegetable. The sauce is edible liquid gold. Pour it over rice and try to have sauce, rice and fish in every bite you take.
lemongrass-1
Can hay-like stalks of grass make for a good ice cream flavor? Only if you follow the directions detailed below.

The recipes for Vietnamese ice cream, or kem (pronounced like “cam” in “camera”), vary as widely as spots on a Dalmation. In this recipe, instead of eggs and cream, we’ll use cornstarch. The result will be a thick, creamy consistency that is denser than a Blue Bell country day.

lemongrass-2
4 cups of whole milk
4 to 5 stalks of lemongrass, coarsely chopped
¾ cup of sugar
3 tablespoons of cornstarch

1. In a 1-quart saucepan, simmer 3 cups of the milk with the lemongrass over medium low heat, stirring occasionally. When the milk begins to bubble, remove from heat, cover and seep for at least 30 minutes to infuse the milk with flavors from the lemongrass.

2. In a large mixing bowl, combine the rest of the milk, sugar and cornstarch. Whisk until sugar and cornstarch are dissolved.

3. Add the warm lemongrass mixture by slowly pouring through a sieve. Using a spatula, press down on the filtered pieces of lemongrass to extract as much of the milk out. Discard the lemongrass.

4. Whisk the milk mixture until even. Wash the saucepan to clean of all milk buildup accumulated during the initial simmering. Pour the milk mixture back into the clean saucepan. Simmer over medium low heat, stirring constantly. Once the milk thickens to the consistency of a custard (dip a spoon in and the back of the spoon should come out with a thick even coat of milk), remove from the heat.

5. Immediately pour into a glass bowl. Cover with plastic and refrigerate for at least 24 hours.

6. Once the mixture has thoroughly chilled, prepare it with an ice-cream maker following the manufacturer’s instructions.

7. Serve with fresh mint leaves or chopped peanuts or both.

Monday, April 12, 2010

Ramen with Bacon, Egg & Char-Siu Pork

Ramen-1

Just because ramen is the go-to food item for those on a tight budget, it doesn’t mean that we can’t indulge our inner chefs when feasting on some freeze-dried noodles. As I've mentioned before, for someone who grew up on this stuff, a package of ramen noodles is like a canister of Play-Doh where you're limited only by your imagination. The following is one of the myriad of ways to make instant noodles a wok to remember.

Before we start, it’s imperative that you forget the “old” way of making ramen and follow my steps below. Don’t worry; when food is concerned, I don’t lead people astray.

Ramen-2
2 slices of bacon, chopped widthwise into thin 1/8-inch strips
1 clove of garlic, minced
6 cups hot water
1 large egg
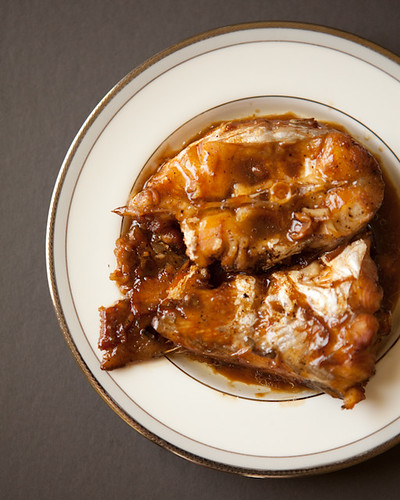
1 good helping of char-siu pork from your favorite Chinese BBQ provider (actual amount depends the level of your char-siu pork hankering)
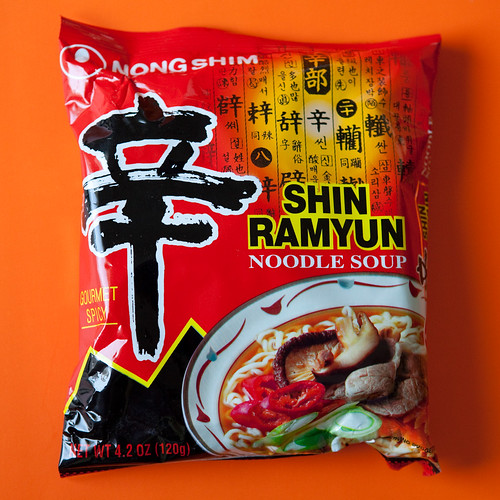
1 package of your favorite instant ramen (currently, mine is Nong Shim’s Shin Ramyun Gourmet Spicy)
2 cups of baby bok choy, leaves separated and washed
1 stalk of green onion, finely chopped (optional)

1. In a 4-quart pot or larger over high heat, cook the strips of bacon for about 3 minutes or until crispy brown, stirring occasionally. Add the garlic and continue stirring for about a minute to release all the garlic’s flavors.

2. Just as the garlic begins to brown, add the hot water to the bacon and garlic and bring to a boil. I know it seems like a lot of water but, by the time we finish this recipe, most of it will evaporate.

3. Once boiling, crack the egg into the water and poach until desired doneness (3 minutes for soft, 6 minutes for hard). Turn heat to medium otherwise it'll boil over. With a slotted spoon, transfer the cooked egg to a bowl.

4. Now add the noodles and its seasoning packet(s). We don’t want to add the seasoning before cooking the egg otherwise the egg will absorb all the salty powdery goodness leaving nothing for the broth. The Shin Ramyun comes with two packets: one is the actual seasoning and the other contains dried herbs and veggies. When the water boils again, cook for another 3 minutes or until desired tenderness. I specify 3 minutes because I prefer my ramen chewy rather than mushy, though I understand some prefer otherwise. Using a slotted spoon or your finest chopstick skills, transfer only the noodles and pork into the bowl with the waiting egg.

5. Bring the water back to a rapid boil. Add the leaves of baby bok choy. Stir and let it come back to a boil. Cook for another minute or until white stalks are slightly translucent and tender. Overcooking will result in mushy bok choy and 7 years of bad luck.

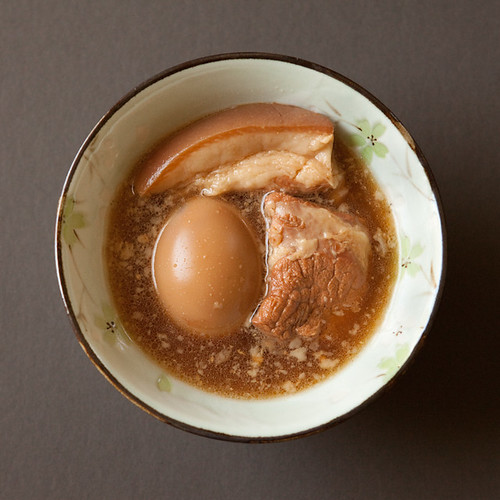
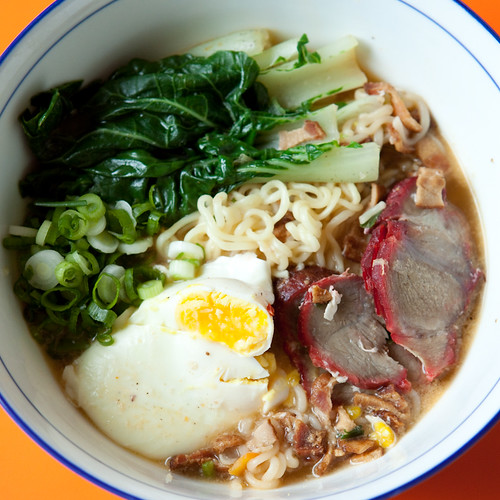
6. Ladle in the bok choy and broth, garnish with chopped green onions and serve.

I typically split this recipe into two bowls to share with my wife so the photo shows only half of the recipe.

Friday, April 9, 2010

Steamed Chicken with Ginger Scallion Dipping Sauce

Chicken-1
This is one of my favorite recipes. It’s easy, delicious, and can feed two adults for 4-6 business days. Also, part of the reason this is a favorite recipe is because I get to use a mezzaluna (pictured below), one of my favorite tools in the kitchen. Growing up, my mama made me mince the old-fashioned way: constantly chopping with a heavy cleaver for 20-30 minutes. With one of these half-mooned miracles, I can get the same results in about 5 minutes. So using the mezzaluna is my way of letting my mama know she made me suffer for nothing. I still love her, though.

1 whole chicken (for less fat, see note below)
1 tsp ground pepper
2 tsp salt
3-inch section of ginger (about the size of both thumbs put together)
1 stalk of green onion
1 clove of garlic
1 tbsp canola oil

1. In a steamer the size of the International Space Station, bring a gallon of water to a boil.

Chicken-2
2. Clean the chicken and remove the neck and innards from the cavity. Set these tasty morsels aside for use in another recipe or discard. Rub the ground pepper and salt into the inner cavity of the chicken. Place the chicken in 12x12 glass baking dish. Cooking will result in large amount of chicken stock. To avoid a chicken that’s half submerged in stock, I place the rack from my toaster oven over the baking dish. This keeps the chicken suspended above the pool of deliciousness that will soon form.
3. Once the steamer is ready, carefully place the chicken into the steamer. Steam for 2 hours. Periodically check the water level and add water as needed.
4. Meanwhile, peel and chop the ginger and garlic. Similarly chop the scallions. Combine ginger, garlic, and scallions onto a cutting board. Using a mezzaluna, mince these ingredients until fine and evenly blended. Transfer to a small bowl. Add salt and canola oil and mix until even.

Chicken-3
5. When the chicken has steamed for 2 hours, remove from heat, remove lid, and let rest for 15 minutes before moving or cutting. This will set the extremely hot and tender meat; otherwise the bird will fall apart in your hands. Once cooled, remove the legs and wings. Chop the remainder into 1-inch pieces. Serve with rice (see below) and your favorite veggies.

With the clear, flavorful chicken stock you’ve now collected in the glass dish, you’re on your way to a myriad of other amazing recipes, including rice for the chicken. My favorite thing to eat with this steamed chicken is rice cooked in fresh chicken stock. Use this to cook 2 cups of jasmine rice and you’re well on your way to spiritual bliss.

Though I've called it "dipping sauce," I usually just mix a spoonful of the ginger-scallion goodness into the rice rice itself. This method also helps me save on soy sauce expenses.

FOR LESS FAT: Before placing the chicken in the steamer, pierce the chicken’s skin multiple times with a sharp knife or fork (12 to 20 times), especially the skin around the fatty areas, e.g., thighs. Be careful to not pierce the actual meat. These pierces will help the fat drip out into the baking dish. Before using the stock you’ve just collected, first pour it through a strainer into another container to remove impurities. Then, refrigerate for 3 hours or until the floating layer of fat solidifies. Carefully remove the layer of hardened lard and now you have yourself about a quart of 99% fat-free chicken stock.

Vietnamese Banana Tapioca Pudding

Banana-2974

One of the many quirks I have is that I prefer eating raw bananas while they're still greenish and unripe. By the time bananas turn yellow, they're too sweet for my preference. Luckily for me, I learned how to convert overly sweet bananas into a simple traditional Vietnamese dessert that exudes awesomeness.

"Chè chuối" (pronounced "chair chewy") is made with bananas and small tapioca balls. "Chè" refers to the traditional Vietnamese sweet dessert that is similar to soup or pudding. "Chuối" means banana. The fact you're still reading means you're awesome.

To make this delectable dessert, you will need the following:

3 cups water
1/3 cups small tapioca pearls
1 to 1-1/4 lbs of ripe bananas (about 4 regular bananas)
2/3 cups canned coconut milk
1/8 tsp salt
1/2 tsp vanilla extract
1 to 3 tsp sugar (see Step 5 below)
1/4 cups finely chopped peanuts (optional)

1. In a medium pot, bring the water to a boil. Add the tapioca and stir immediately so the balls don't stick to each other. Reduce heat to a slow boil and leave for 12 to 14 minutes until the tapioca is half cooked (mostly clear with a small white dot in the center). Stir occasionally to prevent the tapioca from sticking to the bottom of the pot. Be careful not to overcook; we want the tapioca chewy, not mushy.
2. Meanwhile, cut the bananas in half lengthwise and then again into 1-inch chunks. Set aside.
3. When the tapioca is ready as mentioned above (it will become thick and viscous), add the coconut milk and salt and stir until blended. Here's a little trick to make this dessert richer and creamier. Though the can tells us to shake well before using, I like to stick it to the man and not shake. Instead, I open the can and scoop out just the coconut cream that rises to the top. Of course whether you shake it like a Polaroid picture or not, the dessert will still taste great.
4. When the tapioca mixture reaches a boil again, add the banana pieces and stir until evenly distributed. Lower the heat and simmer for 2 minutes or until the bananas are tender, giving the flavors a chance to meld together. Remove from heat.
5. Because the sweetness of this dessert depends largely on the ripeness of the bananas you use, it’s best to add sugar to taste. So before dumping in more sugar, first taste the soup. If you want it sweeter, add 1 tsp of sugar, stir until blended, and taste again. Repeat until desired.
6. Serve with the chopped peanuts as a topping.

Serves 6-8 or 1 monster sweet tooth. Refrigerate unused portion and reheat before serving leftovers.